Friday, October 19, 2012

Truffle-Filled Cupcakes

 
So I saw this recipe by William and Sonoma for truffle-filled cupcakes. The idea was basically to bake a cupcake, insert a truffle while they were cooling and then frost them and add chocolate curls as garnish. I really wanted to try it... with a couple tweaks of course. First of all... I am on a diet. I know, I know. I am a baker. How on earth does a baker diet while baking deliciousness all the time? Easy. We cut out soda, replace chips and fries with veggies and allow ourselves one over-the-top delicious sugar-filled treat a week. 

This was my week for truffle-filled cupcakes.


So I baked up my usual white cake recipe cupcakes. Cut out a small hole in the tops when they came out of the oven (I have seen those fancy cupcake-corers in the William and Sonoma stores but I just used a good old-fashioned orange juice sipper). The William and Sonoma recipe called for their cupcake recipe but it had a lot of William and Sonoma specialty products that I was not willing to drive the hour it takes me to get to one of their stores and then pay ridiculous prices to use a tsp. here and a tbsp. there - never to use again!

I baked 18 cupcakes. I stuffed half of them with a dark chocolate Lindt truffle and and the other half with a white chocolate Lindt truffle. Then I let them melt into the cupcakes until they had completely cooled. A huge dollop of buttercream icing late they were looking a little... plain.

What could I do to make these bakery worthy cupcakes look the part? Well I needed some way of differentiating the dark and white chocolate apart so what better way then to garnish with another delectable truffle? And who doesn't love jimmies?

 
So there you have them. Be warned they are rich. I certainly had my sugar fill of the week from a single cupcake. Had trouble sleeping that night. That's what happens when you keep sugar from the system and then shell-shock it with one of these bad boys. As for the other 17... some very lucky family members and co-workers will be enjoying them. I am on my diet after all.

Saturday, September 8, 2012

Under the Sea Cake


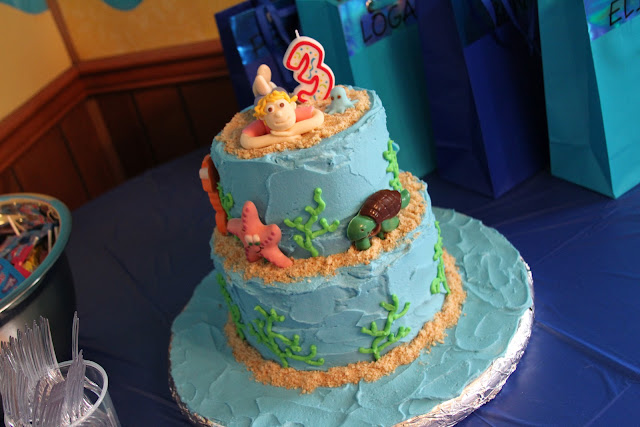
My little girl is turning three! And since she is obsessed with everything aquatic these days (especially octopuses, whales and sharks) my husband and I decided to throw her an Under the Sea themed party. I decided to do an ocean-themed cake with edible chocolate sea life critters. I was stumped on the topper for awhile. At the last minute I decided to take the leap and attempt some 3-D modeling. It took two tries and some rearranging of body parts but I think the end result was pretty awesome. Her little toy octopus was quite easy to accomplish. Here's a closer look at the two.


The 3-D chocolate molds were pretty easy but painstakingly long to make. Melting each color, painting it and refrigerating between each layer took so long. The end result was totally worth it though! If you ever make these, make sure that you make them in advance - this is not a last minute garnish! My favorite one was the starfish so here's a closer look.


So here is the deal for making this cake. Lana requested "pink" cake so I baked up two eight-inch yellow cake layers for the bottom layer and two six-inch strawberry cake layers for the top layer. I always bake my cakes a few days prior to construction so they are completely cooled when I decorate. If I am using buttercream frosting, I double-wrap the layers and place them in the refrigerator. Cold cake layers make a lot less crumbs than room temperature ones do. If I am using fondant I double-wrap the layers and let them stay at room temperature. Fondant has a nasty habit of bubbling out if you cover the cakes when they are cold. Always let the cakes completely cool before wrapping or you will get gummy cakes. Not what we want to deal with.

Next I made the candy plaques. I went to Michaels when they had their Wilton candy melts on sale and bought just about every color they had. Then I melted the colors as I needed them, "painting" in the candy cavity details first, and then filled them with the base color. (More detailed instructions of this process come with the purchased candy molds). Very slow and tedious. And yes, it is necessary to chill between each color or the colors will blend. The brushes that come with the sets are not very fine-tipped so I went ahead and picked up a painter's brush set while I was out. Made it a lot easier to do those teeny tiny details! This set was also set up to have the candy be on lollipop sticks so it was easy to put them on/in the cake. I had some plastic sticks which held up great. I would worry about paper ones getting soggy if the cake is made too far in advance.


The topper is a 3-D model made from gumpaste and fondant. I used instructions that I had from a British- based cake decorating magazine. Lots of cake decorating books have instructions in them for this process. I need a lot more practice and I feel it is something that you really just have to work at and get the feel for it. I was never good at sculpture work in art class. Actually I was never really good at anything in art class! Hopefully I will improve as I continue to practice. The construction of the cake is pretty simple. Stack cakes. Base frost with blue frosting. I left it looking messy to try to simulate the feel of water. The "sand" is vanilla wafers that I threw into a Ziploc bag and crushed with a rolling pin. Then I stuck my ocean critters around the cake, piped on some sea plants and plopped little Lana and her octopus on top. And that's how you do it. Simple, right? Happy Third Birthday Lana! Daddy and I love you so much!

Wednesday, July 18, 2012

Kung Fu Panda Cake


Everybody loves kung fu fighting! A girl that I work with has a daughter that turned two today. Her daughter, Sammi, is completely obsessed with Kung Fu Panda. The theme for her second birthday cake was a no brainer. I searched online for some ideas of a simple double layer 8" round cake design. My co-worker went through the designs I found and settled on this cute version with the movie title spin.

Now I do not pride myself to be any type of sculptor. I actually claim to be a rather terrible artist who just happens to know how to manipulate cake. So this cake design made me excited but extremely nervous. A lot of times with these well known cartoon characters the intention is good but the outcome is less than desirable. It's not just enough to make a cute panda on a cake, there is the pressure to make it look like the beloved character that the child is expecting to be gracing their birthday cake. And believe me, they know the difference!

First I baked up a layer of yellow cake and a layer of chocolate cake. Then I mixed up some buttercream frosting and dirty iced the layers. Usually I make my own fondant but I decided to do the purchased fondant for this particular cake. Two reasons why:

1. Bought fondant comes in true black and true red, nearly impossible colors to make at home.
2. Store-bought fondant is firmer than homemade, making it easier to cut out and construct the panda.

So I covered the cake in the true red fondant and then began constructing Po the panda. First I found a drawing of Po in one of his kung fu poses. Then I sized and printed it to fit on top of the cake (leaving room for the writing of course). Then I took tracing paper and traced each part of the panda. I used these as templates to cut out the different pieces of the panda. Then I put him together like a jigsaw puzzle, adding some 3-D elements to give him more dimension. The belt was made by putting thin chunky strips of fondant in alternating colors, rolling it flat and cutting out the belt. The patch was put on top of his pants and "stitched" on with buttercream icing.


Last but not least I cut out the message and piped a matching yellow border around the bottom of the cake. And there you have it - Kung Fu Panda cake! I love how it turned out. I especially liked Po's face. I think it was a pretty close likeness. At least everyone at work was able to tell who it was when I delivered it today.

It was a good start in learning how to sculpt characters. I will definitely need a lot more practice before going fully 3-D though! I hope that the little birthday girl likes it and has a great second birthday. Happy Birthday Sammi!


Now it's time to start concentrating on my own little girl's big day! She's turning three this year and I'll give you three hints to the theme of her party... sharks.... dolphins... and octopuses!

Saturday, July 14, 2012

Apple Streusel Ice Cream

I have a confession. I have never made homemade ice cream before. I have seen it done several times but have never paid attention to the details. I probably should have. Especially since my sister-in-law, Abi, and I chose a rather impressive recipe to begin our ice cream making skills with:

Apple Streusel Ice Cream
1/3 cup packed brown sugar
1/4 cup all-purpose flour
1/2 teaspoon ground cinnamon
3 tablespoons plus 4-1/2 teaspoons cold butter, divided
1/2 cup chopped pecans
1 cup chopped peeled Golden Delicious apple
2 teaspoons sugar
1/4 teaspoon ground cinnamon
ICE CREAM:
1-1/4 cups milk
3/4 cup sugar
1-3/4 cups heavy whipping cream
1-1/2 teaspoons vanilla extract
1 jar (12 ounces) caramel ice cream topping

For streusel, combine the brown sugar, flour and cinnamon in a bowl; cut in 3 tablespoons butter until mixture resembles coarse crumbs. Stir in pecans. Press into a 9-in. pie plate. Bake at 350°for 10-12 minutes or until the edges are browned. Cool slightly; break into small pieces. Cool completely.

In a skillet, melt remaining butter. Stir in the apple, sugar and cinnamon. Cook for 8-10 minutes or until apple is tender; cool.

In a large saucepan, heat the milk to 175°; stir in sugar until dissolved. Cool. In a large bowl, combine the milk mixture, cream and vanilla. Refrigerate for several hours or overnight.

Fill cylinder of ice cream freezer two-thirds full; freeze according to the manufacturer’s directions. Refrigerate remaining mixture until ready to freeze. Add apple mixture to each batch of ice cream; freeze 5 minutes longer.

Spoon a third of the ice cream into a freezer container. Top with a third of the streusel mixture. Drizzle with a third of the caramel topping. Repeat layers once. Top with remaining ice cream. With a spatula, cut through ice cream in several places to gently swirl layers. Cover; freeze overnight. Garnish with the remaining streusel and caramel topping.

Yield: 1-1/2 quarts

Abi and I started the ice cream on Thursday night. We baked up the streusel and sauteed the chopped apples in a butter, cinnamon and sugar mixture. Last but not least, we mixed up the vanilla ice cream ingredients and popped them in the fridge to chill overnight. Friday night we got together to freeze the vanilla ice cream. We read the ice cream maker instructions and decided it wouldn't be too bad. Put the ice cream mixture into the cylinder, place the cylinder into the bucket, fill bucket with layers of cold water, ice and rock salt per instructions and turn on for 50 minutes. Plain and simple, right?

Forty-five minutes later I began to get concerned. The ice cream maker instructions said that it usually will turn itself off once the ice cream is done. And since the mixture we put in only filled up half the cylinder I thought that it would get done in about 30 minutes. So I turned off the ice cream maker and lifted the top to find.... soup. The mixture hadn't frozen at all! Abi and I (both being ice cream-making virgins) were unsure what our next plan of attack was going to be. We finally decided that maybe we put too much cold water and not enough ice and rock salt around the cylinder so we dumped and started over again.... and after a few more set-backs we finally got it up and churning again. Fifteen minutes later we checked again and.... we had partially frozen ice cream!!! We put the apple mixture in and let it run some more. About fifteen more minutes went by and the ice cream maker shut off. We had our ice cream!!!

Final steps - took out the apple ice cream, layered the streusel and some caramel filling through it, swirled it with a knife and popped it into the freezer to freeze overnight. And now for the big debut....


Gorgeous, right? Looks like it was scooped out of a Edy's carton. I'm sure that it will taste way better though since it is homemade! Abi and I sampled a tiny bit last night and I think I can safely say from the taste test that it is pretty amazing. Sort of a apple crumble a la mode. Will definitely be making some more ice cream recipes before the summer is out!

Wednesday, July 11, 2012

Ooey Gooey Blonde Brownies (also known as Butterscotch Marshmallow Brownies)

The original name of this recipe was Marshmallow Brownies but after making them I felt this was not an accurate description of this delectable concoction of butterscotch, chocolate chips, marshmallows and walnuts! First I whipped up the batter which ended up looking a lot more like gooey cookie dough or seven-layer bars filling than brownie mix!


Then I smooshed it into a glass baking dish and cooked it according to the directions. I tested them with a toothpick (which came out clean) so I took them out and let them cool completely before attempting to cut them for our company that was arriving for dinner that night. About five minutes before company arrived, I decided to slice some up and get a few pictures. But when I tried to take them out of the pan they were just a big ooey gooey mess! I had a minor panic attack thinking that they weren't cooked! Fortunately after some inspection (and taste testing) I found that they were cooked just really chock full of all the ingredients which led to a delightful and delectable chewy blondie brownie filled with chocolate chips, gooey melted marshmallows and walnuts. Therefore I decided to rename them as Ooey Gooey Blonde Brownies.


I highly recommend eating these brownies with a plate and fork (although if you do pre-cut them they will crust up a little around the edges so you could eat them by hand). Here's a copy of the recipe:

Ooey Gooey Blondie Brownies
(Butterscotch Marshallow Brownies)
1 cup (6 ounces) butterscotch chips
1/2 cup butter or margarine
2 eggs
2/3 cup packed brown sugar
1 teaspoon vanilla extract
1-1/2 cups all-purpose flour
2 teaspoons baking powder
1/2 teaspoon salt
2 cups miniature marshmallows
2 cups (12 ounces) semisweet chocolate chips
1/2 cup chopped walnuts

In a saucepan over low heat, melt butterscotch chips and butter; cool for 10 minutes. In a mixing bowl, beat eggs, brown sugar and vanilla. Add butterscotch mixture; mix well. Combine the flour, baking powder and salt; add to batter and mix well. Stir in marshmallows, chocolate chips and nuts. Spread into a greased 13-in. x 9-in. x 2-in. baking pan. Bake at 325° for 25-30 minutes or until brownies test done with a toothpick. Cool before cutting.


Yield: 3 dozen


Later this week, my sister-in-law and I are going to get together to make some homemade ice cream. After that I have another cake on the books! Stay tuned! 

Sunday, July 8, 2012

Oatmeal S'more Cookies


I finally got my Mother's Day present! A classic KitchenAid Mixer! I got my cookbooks right out to find something to make with it and test it out. I thought cookies would be a good start since they are simple but require thorough mixing... and Lana can help too! I got all the Taste of Home June/July issues that have been collecting dust on my bookshelf out and promptly found a recipe for Oatmeal S'more Cookies. Sort of a chocolate chip cookie that gets some oatmeal, chocolate chips and mini marshmallows tossed in to resemble the campfire favorite. Here's a copy of the recipe if you would like to try them:


Oatmeal S'more Cookies 
1/2 cup butter, softened
1/2 cup shortening
1 cup packed brown sugar
1/2 cup sugar
2 eggs
1-1/2 teaspoons vanilla extract
2-1/4 cups all-purpose flour
1 teaspoon baking soda
1/4 teaspoon salt
1 cup old-fashioned oats
1 cup (6 ounces) semisweet chocolate chips
1 cup miniature marshmallows

In a large mixing bowl, cream the butter, shortening and sugars. Add eggs, one at a time, beating well after each addition. Beat in vanilla. Combine the flour, baking soda and salt; gradually add to creamed mixture. Stir in oats, chocolate chips and marshmallows.

Drop by heaping teaspoonfuls 2 in. apart onto greased baking sheets. Bake at 350° for 11-13 minutes or until golden brown. Cool for 1-2 minutes before removing from pans to wire racks to cool completely.

Yield: about 6 dozen


I loved how when they cooked the marshmallows on top of the cookies got brown and bubbly like a roasted campfire marshmallow! It made seven dozen batches so I packed up a few dozen and sent them to family members for taste testing. Now lets see how much of a dent I can make into my massive dessert recipe collection...

Saturday, June 9, 2012

Pink and Zebra-Stripped Cake


I did a Hello Kitty birthday cake about a year ago for a little girl who is the daughter of an old high school friend. She's turning six this year and knew exactly what themed birthday cake she wanted this year - hot pink and zebra-striped! I have seen how to zebra-stripe fondant on several shows and tutorials but had never attempted to do it myself. Here was the perfect opportunity!

I started out by baking two 8-inch by 2-inch yellow cakes and two 6-inch by 2-inch chocolate cakes. Then I made two batches of fondant - one white and one as bright pink as I could. I'm not sure how they get hot pink so I just had to do pink. Note to self to experiment with that later. I bought the black fondant because it is impossible to get true black unless you purchase it. I made the topper first because it needed to dry for a couple days to stand on top of the cake. I cut the 6 out with a cookie cutter and then laid it on top of some black fondant, cutting a background 6 (freehand-style) with a cutting wheel. After it had dried for 12 hours, I flipped it over and attached a lollipop stick to the back with another piece of black fondant.

I covered the chocolate cakes with pink fondant; zebra-striped the white fondant with black and covered the yellow cakes. My husband helped me stack the cakes and then I just decorated! I cut the A out with a craft knife and homemade template (also compliments of my husband). Last but not least I bordered the edges with a fun "party hat ruffle" and attached the happy birthday banner.


This cake was a lot of fun to make. I learned a lot about covering cakes with fondant:

1. Just crumb coat the cakes you are covering. Too much icing will cause the cakes to be lumpy and the fondant to stretch, tear, slide and get goopy. Technical, right?
2. Only use as much fondant as you need to cover the cake! Using too much will just cause frustration. You won't be able to roll it out to the appropriate thickness and the weight will cause it to tear when trimming the edges.
3. When zebra-striping fondant, make sure that you cut the strips thin and you add them before rolling the fondant too close to the appropriate thickness. If you add them later, they will not form a uniform piece!

I am very pleased to say that my goal of drawing conceptual cakes has been progressing. This cake is proof of that! Of course I did not design the cake (I was sent a picture of the style and just tweaked it to fit the birthday girl) but it is a great start! Happy 6th Birthday Aryn!


PS ~ My mixer is still broken but thankfully I have a great mom who let me borrow hers to help make this creation happen! Brave woman with my history of mixer damage! I'm glad to say that the mixer was not harmed during the making of this cake :)