Friday, December 7, 2012

Mexican Chocolate Cupcakes with Browned Butter Frosting

I am on a new mission. To discover the most delicious cake flavors, frosting and fillings in order to make my cake creations as tasty as possible! I have about a dozen cake books and magazines featuring all kinds of sugary goodness. I decided to grab one and start from the beginning - making all the recipes that I think would work well in a very diverse taste test group (thank goodness to all my family, friends and co-workers)!

First on the list was Mexican Chocolate Cake with Carmelized Sugar Frosting. I had never made this type of frosting before and it looked glaze-like in the photos so I decided to switch it out with some Browned Butter Frosting for some stability. I had planned to place a seashell chocolate garnish on top and needed something I knew wouldn't slide!

While we are on the subject, let's talk garnishes. The joy of cupcakes is their vastness in garnish ability! From exquisite chocolate curls to simple jimmy toppings and complex fondant modeling - the possibilities are endless! I want to experience it all! I went for the simple chocolate mold garnish this time but watch out! The more cupcakes I produce the more toppings I get to experiment with (and being a biologist in real life you know how I love to experiment)!


So what makes a chocolate cake a Mexican Chocolate Cake? A small addition of cinnamon to the chocolate cake batter! The cake ended up being really moist with a hint of the cinnamon. And Browned Butter Frosting? If you haven't had it yet - make it now! A little goes a looong way! Super rich but super worth it! These were so fun to make that I even got my daughter in on the decorating. Here's a picture of her super cuteness for you. She had just decorated a cupcake and held it up and said "Mommy, it's my first cupcake!" We were both so proud :)


Here's the recipe for all of my fellow baking comrads!

Mini Mexican Chocolate Cupcakes
(from Betty Crocker's SuperMoist cakes  for all occasions publication)
1 box Betty Crocker Supermoist devil's food cake mix
1-1/3 cups water
1/2 cup vegetable oil
1 teaspoon ground cinnamon
3 eggs

1. Heat oven to 350F. Place paper liners in mini cupcake pan.

2. In large bowl, beat cake ingredients with electric mixer on low speed 30 seconds. Beat on medium speed 2 minutes, scraping bowl occasionally. Divide evenly among cupcake liners. Bake 10 to 12 minutes or until toothpick inserted in center comes out clean. Cool completely, about 1 hour.

3. Frost cupcakes with Browned Butter Frosting (recipe follows). Top with a fun garnish!

Yield: 6 dozen mini cupcakes

Browned Butter Frosting
(from The Cupcake Bible)
Melt 1 cup (2 sticks) unsalted butter in small saucepan over medium heat. Cook and stir until light brown. Remove from heat, let stand 10 minutes. Combine browned butter, 5-1/2 cups powdered sugar, 1/4 cup milk, 1-1/2 teaspoons vanilla and 1/8 teaspoon salt in large bowl. Beat with electric mixer at medium speed until smooth. Add additional milk, 1 tablespoon at a time, if frosting is too stiff. Makes about 4 cups.


Saturday, November 17, 2012

Lego Cake


So I got the order for this cake on Thursday. Sort of a last minute thing. A guy who I work with has a son who is turning eight today. He had gone to several grocery stores asking for a Lego Cake but they all told him that they didn't do custom work. They wouldn't even make a cake and plop some Legos that he would have provided on it! A little ridiculous if you ask me. So he was discussing this problem at work and another guy who I am making a cake for in December sent him my way. At first I thought... I have one day to make this cake... I better do it up simple. Maybe one large Lego? That would be easy enough, right? And then I remembered the candy blocks at the Amish market and all the cool Lego cakes I have seen online. I could do better than that! Of course the first thing I did was ask the guy for artistic leisure on the design. He gave me the go ahead! Then I called up my husband to make me a stencil Lego pegboard to make the top of the cake. I was inspired!

Unfortunately the next day my daughter got a nasty stomach virus. The poor kid got her first unpleasant experience of regurgitation... in the refrigerated section of Walmart. So this cake was a lot harder than it should have been. I was shaky on the actual plan of attack and was running back and forth to check on my daughter and try to coax fluids and Tylenol into her. By the time my husband got home I was completely frazzled! I finally calmed myself down and thought - what is it I want to do with the design? I wanted to build up a Lego wall around the cake and then have the top appear to be a flat pegboard for further building. I also wanted it to look like it was under construction. Little Lego men builders and such.

First I frosted an eight-inch square chocolate cake with buttercream frosting. Then I tried to "glue" the bricks to the side. No good. Then I tried building the wall into the side of the cake. No good. By this time it was 7:30pm and I was really beginning to panic. I had no Lego cake and I had to drag my butt into work the next day! I took a breather and vented some frustration to my husband who quickly jumped into action and went to buy me some Lego construction pieces. It was just enough of a break and vent session for me to get it together and decide a new plan of attack. Build the wall first and then slide it up against the side of the cake. Eureka!


Of course I left one wall slightly undone... for two reasons. First of all... I ran out of candy blocks - but it worked to my advantage because I wanted the cake to look like it was under construction. So I tore down part of one wall, using some of the blocks to finish the edging on the cake and others to sprinkle around for the loader construction vehicle. Next I rolled out some green and brown fondant and used the stencil that my husband made for me to make it look like pegboards. Then I put it on top of the cake with the dump truck. Finally I spelled out the birthday boy's name with some more of the candy blocks.


And there you have it. A Lego cake. I think this design will go a lot smoother (and neater) now that I have done one and know what I am doing! It would be fun to do some different ones and customize it to the type of Legos that the birthday child likes! I also think that Lego cupcakes would be amazing! I just hope that it blew the socks of the birthday boy! I don't have much experience with designs for boys but I definitely would like to have some more in my cake portfolio. I have another Lego cake on the books for December. We'll see how that one goes! Have a great Thanksgiving everyone!

Saturday, November 10, 2012

Apple Cider Cupcakes


It's official. I have gone cupcake crazy! Mini cupcake crazy to be specific. I, like most people obsessed with baking, have tons and tons of cake recipes that I am just dying to try. Cakes, cheesecakes, cookie cups - you name it! But I am shy about baking all that delectable goodness. Cakes go to waste at my house. Three people just don't want to eat a cake every week... or even every month! Family and fellow employees are always willing to take some off my hands but the transportation is a nightmare! So how will I ever get through all these delicious recipes to weed out the good from the bad? In cupcakes of course!

I know that they take a little more work to bake and decorate each individual cake but in the long run it is a win situation. First of all cupcakes are baked in liners making clean up much more efficient. Second they are already "pre-portioned" to take the leftovers to work the next day (I find most people shy away from cutting a piece of cake but cupcakes are a nice grab and go for people). Not to mention decorating is a lot easier and I can eat a single serving to see if I like the recipe or not and then give the rest away. All in all... I totally get the cupcake crazy right now!

This week I tried Apple Cider Cupcakes. This recipe calls for an apple cider spiked spice cake topped with apple cider buttercream frosting. The spice cake is really moist. I would recommend using paper liners instead of foil. I used foil and the cakes were popping out of the liners before I could get them frosted! The frosting was a little tricky as well. The cider does not blend well with the butter until you get some of the sugar in there. Make sure you use all four cups of the confectioners' sugar! I somehow forgot the last cup in mine and my buttercream frosting was a little soupy and impossible to pipe onto the cupcakes. It was still tasty though!

Apple Cider Cupcakes
(recipe from The Cupcake Bible)
1 package (about 18 ounces) spice cake mix
1-1/4 cups apple cider
1/3 cup vegetable oil
3 eggs
2 cups coarsely chopped walnuts, plus additional for garnish
Apple Cider Frosting (recipe follows)

1. Preheat oven to 350 F. Line 24 standard (2-1/2-inch) muffin cups with paper baking cups.
(For mini cupcakes: Line 6 dozen mini muffin cups with paper baking cups).

2. Beat cake mix, apple cider, oil and eggs in medium bowl with electric mixer at low speed until blended; beat at medium speed 2 minutes. Stir in 2 cups chopped walnuts. Spoon batter evenly into prepared muffin cups.

3. Bake 20 minutes or until toothpick inserted into centers comes out clean. Cool in pans 10 minutes. Remove to wire racks; cool completely.
(For mini cupcakes: Bake 10 minutes and cool in pans for 5 minute before transferring to wire racks).

4. Prepare Apple Cider Frosting; frost cupcakes. Garnish with additional chopped walnuts.

Makes 24 cupcakes or 6 dozen mini cupcakes.

Apple Cider Frosting: Beat 1/2 cup (1 stick) softened unsalted butter and 1/4 cup apple cider in medium bowl with electric mixer at low speed until well blended. Gradually beat in 4 cups powdered sugar until smooth. Makes about 3 cups.

I wanted to make my cupcakes a little more fancy so instead of the walnut garnish, I cut out some maple leaf and acorn nuts out of refrigerated pie crust with some wonderful pie crust cutters that I got for Christmas a few years back (they are from William and Sonoma and I love them!). Brushed them with an egg wash to get that nice gold color and popped them in the over for 13 minutes at 375 F.

And there you have it. Beautiful fall cupcakes made easy! Enjoy the leaf piles and wonderful weather now - winter is fast approaching and holiday baking is soon to commence!


Sunday, November 4, 2012

Martha Stewart Style Halloween Cupcakes


First of all I would like to say that I know it is technically November and I am posting a Halloween-themed dessert. Due to Hurricane Sandy our Halloween Farm Party got pushed back a week. The hurricane wasn't too awful in this area, we did have three or four leaks in the house, and lost power for 2.5 days, but I was thankful to still have the house mostly intact and everyone safe and sound!

So have you ever seen those annoyingly perfect Martha Stewart-style cupcakes? You know , the ones that are all individually decorated with perfect embellishments that are probably made just for her show and don't exist in the real world? I have always wanted to make those types of cupcakes! And it just so happens that I stumbled across some fancy Halloween sprinkles at William and Sonoma on sale when I was out for my birthday a couple weekends ago! It was time to get down to business!

I choose to bake mini cupcakes instead of regular ones. Our farm party was for the kids and since they are all on the younger side right now - mini is better. I mixed up a batch of yellow cake mix which ended up making about 6 dozen cupcakes. Then I tinted up some buttercream frosting and got to decorating!


I choose purple frosting since most of the sprinkles were white, orange, green and black. It contrasted nicely. I used a large swirl flower tip to get a nice base for the decorations. The Halloween sprinkle kit had bones, bats, large pearls, regular sprinkles, large dots, bat and pumpkin sprinkles - it was awesome! And even after 6 dozen cupcakes I still have some left over for future Halloweens!

They turned out so cute! The kids and parents enjoyed them and I even had enough leftovers to take a tray of them to work the next day. Work people are always appreciative of left-over baked goodies. One thing I do not lack is taste-testers for all my creations!

I wish I had gotten some better pictures of them on the cake stands. I didn't even get a chance to snap a photo of the fancy cake stand I borrowed from my Mom for the party! Oh well, I am sure she will let me borrow it again for another creation! Another baking wish to cross off my baking bucket list!


And now comes my favorite time of the year! Holiday Baking!!! Stay tuned for more deliciousness!

(PS - I'm staying strong on the diet! Down six pounds and hoping to get through these next few months dropping some more! I have gotten extremely picky with my deserts since I can only have one a week. Forget Snickers bars and Oreos - I need cheesecakes and gourmet cupcakes if I'm going to waste calories!)

Friday, October 19, 2012

Truffle-Filled Cupcakes

 
So I saw this recipe by William and Sonoma for truffle-filled cupcakes. The idea was basically to bake a cupcake, insert a truffle while they were cooling and then frost them and add chocolate curls as garnish. I really wanted to try it... with a couple tweaks of course. First of all... I am on a diet. I know, I know. I am a baker. How on earth does a baker diet while baking deliciousness all the time? Easy. We cut out soda, replace chips and fries with veggies and allow ourselves one over-the-top delicious sugar-filled treat a week. 

This was my week for truffle-filled cupcakes.


So I baked up my usual white cake recipe cupcakes. Cut out a small hole in the tops when they came out of the oven (I have seen those fancy cupcake-corers in the William and Sonoma stores but I just used a good old-fashioned orange juice sipper). The William and Sonoma recipe called for their cupcake recipe but it had a lot of William and Sonoma specialty products that I was not willing to drive the hour it takes me to get to one of their stores and then pay ridiculous prices to use a tsp. here and a tbsp. there - never to use again!

I baked 18 cupcakes. I stuffed half of them with a dark chocolate Lindt truffle and and the other half with a white chocolate Lindt truffle. Then I let them melt into the cupcakes until they had completely cooled. A huge dollop of buttercream icing late they were looking a little... plain.

What could I do to make these bakery worthy cupcakes look the part? Well I needed some way of differentiating the dark and white chocolate apart so what better way then to garnish with another delectable truffle? And who doesn't love jimmies?

 
So there you have them. Be warned they are rich. I certainly had my sugar fill of the week from a single cupcake. Had trouble sleeping that night. That's what happens when you keep sugar from the system and then shell-shock it with one of these bad boys. As for the other 17... some very lucky family members and co-workers will be enjoying them. I am on my diet after all.

Saturday, September 8, 2012

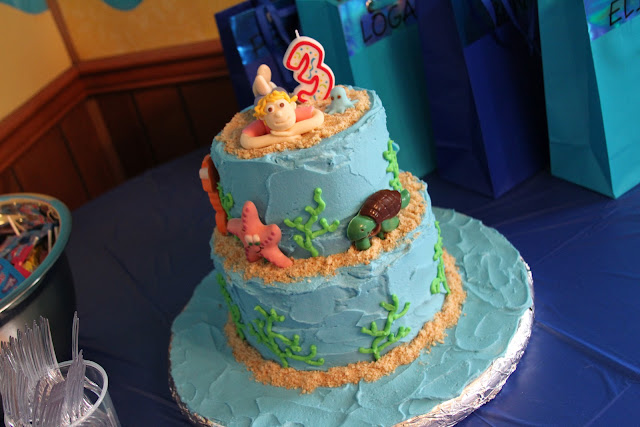
Under the Sea Cake


My little girl is turning three! And since she is obsessed with everything aquatic these days (especially octopuses, whales and sharks) my husband and I decided to throw her an Under the Sea themed party. I decided to do an ocean-themed cake with edible chocolate sea life critters. I was stumped on the topper for awhile. At the last minute I decided to take the leap and attempt some 3-D modeling. It took two tries and some rearranging of body parts but I think the end result was pretty awesome. Her little toy octopus was quite easy to accomplish. Here's a closer look at the two.


The 3-D chocolate molds were pretty easy but painstakingly long to make. Melting each color, painting it and refrigerating between each layer took so long. The end result was totally worth it though! If you ever make these, make sure that you make them in advance - this is not a last minute garnish! My favorite one was the starfish so here's a closer look.


So here is the deal for making this cake. Lana requested "pink" cake so I baked up two eight-inch yellow cake layers for the bottom layer and two six-inch strawberry cake layers for the top layer. I always bake my cakes a few days prior to construction so they are completely cooled when I decorate. If I am using buttercream frosting, I double-wrap the layers and place them in the refrigerator. Cold cake layers make a lot less crumbs than room temperature ones do. If I am using fondant I double-wrap the layers and let them stay at room temperature. Fondant has a nasty habit of bubbling out if you cover the cakes when they are cold. Always let the cakes completely cool before wrapping or you will get gummy cakes. Not what we want to deal with.

Next I made the candy plaques. I went to Michaels when they had their Wilton candy melts on sale and bought just about every color they had. Then I melted the colors as I needed them, "painting" in the candy cavity details first, and then filled them with the base color. (More detailed instructions of this process come with the purchased candy molds). Very slow and tedious. And yes, it is necessary to chill between each color or the colors will blend. The brushes that come with the sets are not very fine-tipped so I went ahead and picked up a painter's brush set while I was out. Made it a lot easier to do those teeny tiny details! This set was also set up to have the candy be on lollipop sticks so it was easy to put them on/in the cake. I had some plastic sticks which held up great. I would worry about paper ones getting soggy if the cake is made too far in advance.


The topper is a 3-D model made from gumpaste and fondant. I used instructions that I had from a British- based cake decorating magazine. Lots of cake decorating books have instructions in them for this process. I need a lot more practice and I feel it is something that you really just have to work at and get the feel for it. I was never good at sculpture work in art class. Actually I was never really good at anything in art class! Hopefully I will improve as I continue to practice. The construction of the cake is pretty simple. Stack cakes. Base frost with blue frosting. I left it looking messy to try to simulate the feel of water. The "sand" is vanilla wafers that I threw into a Ziploc bag and crushed with a rolling pin. Then I stuck my ocean critters around the cake, piped on some sea plants and plopped little Lana and her octopus on top. And that's how you do it. Simple, right? Happy Third Birthday Lana! Daddy and I love you so much!

Wednesday, July 18, 2012

Kung Fu Panda Cake


Everybody loves kung fu fighting! A girl that I work with has a daughter that turned two today. Her daughter, Sammi, is completely obsessed with Kung Fu Panda. The theme for her second birthday cake was a no brainer. I searched online for some ideas of a simple double layer 8" round cake design. My co-worker went through the designs I found and settled on this cute version with the movie title spin.

Now I do not pride myself to be any type of sculptor. I actually claim to be a rather terrible artist who just happens to know how to manipulate cake. So this cake design made me excited but extremely nervous. A lot of times with these well known cartoon characters the intention is good but the outcome is less than desirable. It's not just enough to make a cute panda on a cake, there is the pressure to make it look like the beloved character that the child is expecting to be gracing their birthday cake. And believe me, they know the difference!

First I baked up a layer of yellow cake and a layer of chocolate cake. Then I mixed up some buttercream frosting and dirty iced the layers. Usually I make my own fondant but I decided to do the purchased fondant for this particular cake. Two reasons why:

1. Bought fondant comes in true black and true red, nearly impossible colors to make at home.
2. Store-bought fondant is firmer than homemade, making it easier to cut out and construct the panda.

So I covered the cake in the true red fondant and then began constructing Po the panda. First I found a drawing of Po in one of his kung fu poses. Then I sized and printed it to fit on top of the cake (leaving room for the writing of course). Then I took tracing paper and traced each part of the panda. I used these as templates to cut out the different pieces of the panda. Then I put him together like a jigsaw puzzle, adding some 3-D elements to give him more dimension. The belt was made by putting thin chunky strips of fondant in alternating colors, rolling it flat and cutting out the belt. The patch was put on top of his pants and "stitched" on with buttercream icing.


Last but not least I cut out the message and piped a matching yellow border around the bottom of the cake. And there you have it - Kung Fu Panda cake! I love how it turned out. I especially liked Po's face. I think it was a pretty close likeness. At least everyone at work was able to tell who it was when I delivered it today.

It was a good start in learning how to sculpt characters. I will definitely need a lot more practice before going fully 3-D though! I hope that the little birthday girl likes it and has a great second birthday. Happy Birthday Sammi!


Now it's time to start concentrating on my own little girl's big day! She's turning three this year and I'll give you three hints to the theme of her party... sharks.... dolphins... and octopuses!